The resources of this post can be found on Github.
One of my friends had a problem with his laptop: It crashed when screensharing was enabled in a Zoom session. I like to empower people to use Linux, thus I’m also supporting them when they have problems. So I tried to help.
It was an old laptop running Ubuntu 22.04 LTS. Before looking into the screenshare issue, we used Teamviewer for a shared session to update the system to latest Ubuntu (24.04 LTS). Unfortunately, gdm3 (GNOME display manager) crashed during the update, so we didn’t know what was going on. After some time, we rebooted the device by hard resetting it. Then, the machine failed to boot:

Initially, I told him to fix this problem but then his machine refused to boot at all - great advertisement for Linux 😀. He was a non-tech person and all we got now was a Signal chat.
Feel free to take a break here: What have you done here at this point?
I was confident I could solve the problem, but I needed a remote shell. But how to get one? There was no prompt to login. Other TTYs (CTRL + ALT + Fx) have not been there. The first step was to get a remote shell. On Ubuntu, it’s fairly simple to boot into recovery mode (wiki). Keep in mind: This needs to be done by the non-tech person.
- Use a network cable to connect the laptop with the router/switch
- Turn on the device
- Open GRUB menu
- on BIOS devices: quickly press and hold the Shift key
- on UEFI devices: Escape key
- Boot into recovery
- select “Advanced options” (use the arrow keys)
- select the line ending with “(recovery mode)”
- Get network: “Enable networking”. This won’t work with wifi. It tries to get an ip address using dhcp.
- Get a root shell: “Drop to root shell prompt”.
If you’re booting on a system without recovery mode option in the “Advanced options”, you can do this manually: Press e to change the GRUB config and add systemd.unit=rescue.target as kernel command line argument (add this to the line starting with linux). Resume to boot with F10. TODO: Get network access.
At this point the root file system is mounted to /. You could get a remote shell with something like nc -e /bin/bash IP PORT. But the shell is inconvenient, so I used tmate (a friend told me about).
Let me quickly introduce tmate. It’s an easy to use tool to share a terminal session. Technically it’s based on tmux and the ssh protocol. tmate works even when sitting behind NAT. Authentication is done by random characters in the ssh username. You can also give people read-only access and there is also a http link to watch the session in the browser. This is how it looks like:
kmille@spring:~# tmate
Tip: if you wish to use tmate only for remote access, run: tmate -F                                                                                                     [0/0]
To see the following messages again, run in a tmate session: tmate show-messages
Press <q> or <ctrl-c> to continue
---------------------------------------------------------------------
Connecting to ssh.tmate.io...
Note: clear your terminal before sharing readonly access
web session read only: https://tmate.io/t/ro-EmZ8hsfM6MNCfhcCpSvmG9bGD
ssh session read only: ssh ro-EmZ8hsfM6MNCfhcCpSvmG9bGD@lon1.tmate.io
web session: https://tmate.io/t/ZAX2zGYDx8cc3aXSRDrS6D4HL
ssh session: ssh ZAX2zGYDx8cc3aXSRDrS6D4HL@lon1.tmate.io
As this is about code execution, you don’t want to rely on third party infrastructure. You can host the backend on your own. I failed to build it from source, but the docker image worked. Before starting, you once have to generate ssh-keys for tmate. You can use this little script which is part of the repo. I didn’t want to have the non-tech person doing too much manually, so here is my “automated” solution:
On my server, I use this docker-compose.yml
services:
  tmate-server:
    image: tmate/tmate-ssh-server:pr
    volumes:
      - ./keys:/keys
    environment:
      - SSH_KEYS_PATH=/keys
      - SSH_PORT_LISTEN=8081
      - SSH_HOSTNAME=freetar.de
      - USE_PROXY_PROTOCOL=0
    ports:
      - 8081:8081
    cap_add:
      - SYS_ADMIN
  http-logger:
    image: mendhak/http-https-echo
    ports:
      - 8082:8080
  web-server:
    image: nginx
    volumes:
      - ./www:/usr/share/nginx/html
    ports:
      - 8083:80
The user only needs to run this manually: curl freetar.de:8083/setup.sh | bash
Of course, you can also use SSL, but this is out of scope for this tutorial. Also having a short domain makes it a bit easier (btw: Have you tried https://freetar.de?).
What is setup.sh doing? It
- downloads the static compiled tmate binary
- writes a tmate config to
/tmp/tmate.conf(use my backend) - runs tmate and logs the command line output to
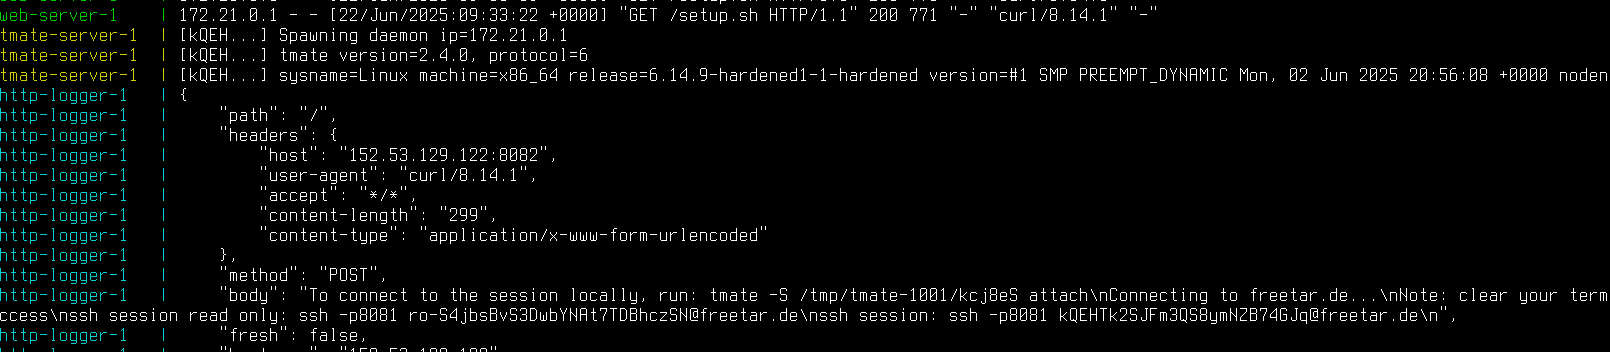
/tmp/tmate.log - sends the auth infos (contained in
/tmp/tmate.log) back to my server, where I can see them in the logs (mendhak/http-https-echo image, check the header image of this post)
setup.sh is served by the nginx image, which runs on port 8083 in my case.
Fails and learnings
- The
curl | bashapproach didn’t work in the first place, as some dependencies (libraries) where broken/missing. We debugged it together while having a Signal call. The original problem: We shut down the laptop while it was still updating the system. It already downloaded all packages. So we just needed to runapt --fix-brokenordpkg --configure -a. Then I could fix the rest having a remote shell. - We should not have hard resetted the device in the first place. We could have used a different tty to check which processes are still running. But the system was very slow and not responding at all. I wanted to avoid dictating Linux commands via chat/phone.
- Before updating the system, I recommend checking
/etc/apt/*list. I often see people running random commands from the internet, ending up installing too much unncessary software. This software should be removed in the first place. - Before debugging the system together with Teamviewer, send the non-tech person some commands to collect information about the system
- The crashing Zoom session was caused by Wayland.
- I highly recommend reading the systemd documentation: Diagnosing Boot Problems
Some useful commands
Get information about the system
cat /etc/issue
lsblk -f
free -h
df -h
Get all package names currently installed
dpkg -l | grep ^ii | awk '{print $2 }'
Get all installed packages not being in a clean state. Reinstall them.
dpkg -l | grep -v ^ii
apt install --reinstall $(dpkg -l | grep "^iU" | awk '{ print $2 }' | tr '\n' ' ')
Where is a package coming from (Ubuntu or third party repo)?
apt-cache policy tor
Iterate over all installed packages. Write package name and package repo in a file
for package in $(dpkg -l | grep ^ii | awk '{print $2 }'); do echo $package; apt-cache policy $package | apt-cache policy $package | grep -F '***' -A1; done | tee /tmp/packets.txt | tee /tmp/packets.txt
Useful systemd commands
systemctl --failed
systemctl list-unit-files --state=enabled
systemctl list-dependencies
systemctl list-dependencies systemd-resolved.service
systemctl list-dependencies multi-user.target
journalctl -b -p3
Useful log files to check
/var/log/apt/history.log
/var/logdpkg.log
/var/log/dist-upgrade